 Categories
 Information
 Our Partners
  Shopping Cart
 Featured


 Shipping Estimate
  Specials
 Bestsellers


Flow Trough Bin manual
Flow through bin manual
Use Red Worms or Tiger Worms only. The common garden/earth worm is not suitable.
Setting up the system
Flow through worm bins consist of several stackable wooden frames, bottom stand with raised floor made of metal grill, scraper, plastic drip tray and the lid. The worms live in compost that fills the volume inside the frames. They occupy upper 10 - 12 inces of the compost, where they can find fresh food: fruit, vegetable and other scraps that might otherwise go to waste. These scraps are turned into the castings that make such good fertilizer.
The drip tray is a plastic paint tray, used to catch liquid run-off that percolates down from the bin. It is also used for compost harvesting.
To create congenial living conditions for the worms, you need bedding and soil to start the farm and a continuing supply of suitable food scraps.
Starting the farm
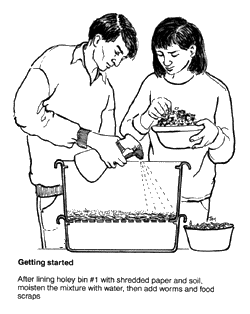
- Soak 2lb of dry bedding (the standard package form Wood Worm Farms) in 1 litre (4.5 cups) of non- chlorinated water. It's better to use rain or pond water.
- Let the bedding to absorb water for minimum 2 - 3 hours, better several days.
- Put one frame on the base. You don't need other frames now.
- Put the drip tray on the floor beneath the bin - to prevent water from dripping on the floor.
- Put the wet bedding in the frame, on top of the metal grill.
- Put worms on top of the bedding
- Cover with the lid.
Allow the farm to settle in for a week before lifting the cover and putting in more food scraps. Bury food scraps in different spots of the bin covering them with ready compost, add some more bedding if necessary. At the beginning you can use some soil to cover food scraps. Later you will use the compost harvested from the bottom of the bin. Check on the bin's progress and add more food scraps as the worms grow and multiply. Make sure that your worms have enough food, but don't overfeed them - uneaten food will simply rot, resulting in a smelly farm and unhappy worms.
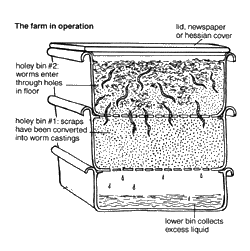
When first frame is full of worms and worm castings, remove the cover and place second one on top. Continue putting food scraps, new bedding and some old compost in frame #2 and, again, exclude light and keep the contents moist. In about 2-3 weeks the worms from frame #1 will have moved up into the fresh food in frame #2. If you have more frames, repeat the same operation with each one in its time. If it's your last frame, harvest ready vermicompost by disturbing the bottom layer with the scraper. The sifted compot will fall into the drip tray. Only about 1 -2 inches of vermicompost should be harvested at a time, keeping a large volume of bedding in situ. Collected castings can be spread on the garden or used for pot plants.
The continuous flow system does require some time to set up properly. Harvesting should not begin until the bin is nearly full of vermicompost. Feeding in regular, thin layers will encourage the worms to concentrate in the upper areas of the system, where microbial activity is highest. Over or underfeeding will tend to encourage the worms to migrate throughout the material in the unit in search of food.This might result in worms being harvested with the vermicompost, and will lessen the efficiency of the process.
Continuous flow systems are the easiest currently available to manage and harvest. The key factors are:
- Keep adding thin layers of food at the top
- Build up a deep volume of vermicompost as bedding before harvesting small amounts from below
- Keep the whole system moist
Hints for happy worms
Light
Worms usually live underground so they thrive in an environment that is cool, dark and moist.
Moisture
Worms like moisture and should not be allowed to dry out. It's better to keep moisture on its higher lever. A light spray of fresh water is required sometimes during the farm operation. If the bin consistently remains too dry you can put a perforated piece of plastic bag between the bottom stand and the lowest tray to reduce airflow ant thus evaporation. If a content of a bin becomes too moist you can add some dry bedding to balance the moisture.
Food
Worms are voracious eaters. Once the worms are settled in and growing, give them a good supply of suitable food.
Worms like most vegetable and fruit scraps, but as worms do not have teeth, scraps should be cut into relatively small pieces. Even larger pieces, though, will eventually rot and decompose, but this could take more time. Worms need a small amount of sand (mixed with garden soil) added to the food for their digestion system. 
Worms also like:
- soaked and ripped pizza boxes
- shredded and soaked cardboard
- paper
- fruit and vegetable (except onions and citrus)
- leaves
- dirt
- hair
- egg shells.
Worms can't eat live vegetation (otherwise we wouldn't have any plants left on Eart), so some live vegetable scrap, like potato peels, cabbage hears, carrot 'tails', etc. has to be heated in a microwave and then cooled; or, alternatively, frozen in a freezer and then defrosted, before it gets to the bin.
It's a good idea to store the food scraps in a plastic container for a week before giving them to worms. The worms like this "pre-fermented" food.
Worms will eat meat but it can lead to smells and maggots in the worm farm.
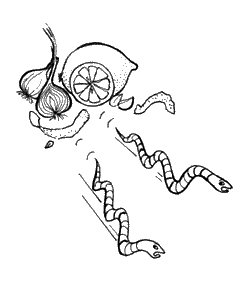
Plants from the onion family (including garlic and shallots) and citrus fruits contain volatile oils. Small amounts of these products are OK, but if too much of these are included in the food scraps the worms will climb out of their bin to get away from the smell.
If this happens to your worm farm, place another tray full of wet bedding with a fresh food supply on top of the contaminated tray. Once the worms have climbed out of the contaminated tray (about a week) remove it and use the castings for normal hot compost - the uneaten onion and citrus won't hurt the garden.
Worm farm 'produce'
Castings can go straight onto the garden or pot plants. If they are covered with mulch their moisture and nutrient content will be conserved.
An excellent liquid fertilizer can be made from the castings by adding water until the mixture looks like weak tea. African violets and other plants that like being fed from the roots, just love this mixture.
Moisture drained from the worm farm's bottom crate is also a good liquid fertilizer, but it too should be diluted.
Excess worms can be put in the compost heap where they will help speed up the composting process.
October 2011
